Billiard Pool Table Basics: Essential Pool Table Parts for Beginners
📋 Table of Contents
- 1. What is a Pool Table? Understanding the Basics
- 2. Pool Table Dimensions and Layout Overview
- 3. Essential Pool Table Parts: The Playing Surface
- 4. Rails and Cushions: The Boundaries of Play
- 5. Pockets and Spots: Key Reference Points
- 6. Markings and Strings: Navigation on the Table
- 7. Pool Table Diagram: Complete Visual Guide
- 8. Frequently Asked Questions
1. What is a Pool Table? Understanding the Basics
A pool table, also called a billiard table, is a bounded playing surface designed for cue sports. The table features a flat playing area covered in cloth, surrounded by cushioned rails, and equipped with pockets where balls are targeted. Pool tables come in various sizes, but all share the same fundamental components and proportions.
Standard Pool Table Sizes
Pool tables are manufactured in several standard sizes to accommodate different spaces and skill levels:
- Professional Tournament Size: 9 feet × 4.5 feet (2.74m × 1.37m)
- Regulation Size: 8 feet × 4 feet (2.44m × 1.22m)
- Home/Bar Size: 7 feet × 3.5 feet (2.13m × 1.07m)
- Small Home Size: 6 feet × 3 feet (1.83m × 0.91m)
All regulation pool tables maintain a 2:1 length-to-width ratio. This means the playing surface is exactly twice as long as it is wide. This standardization ensures consistent gameplay across all table sizes and allows players to develop transferable skills regardless of the table they're playing on.
Why Learning Table Anatomy Matters
Understanding pool table parts is essential for several important reasons:
- Following Game Rules: Many rules reference specific table areas like "the kitchen" or "behind the head string." Without knowing these terms, you can't play correctly.
- Improving Your Game: Professional players use table markings for aiming, positioning, and strategy. Understanding the table's geometry gives you these same advantages.
- Effective Communication: When discussing shots or receiving instruction, knowing proper terminology prevents confusion and speeds up learning.
- Equipment Selection: If you're buying a table, understanding quality indicators in each component helps you make informed decisions.
- Maintenance and Care: Proper table care requires knowing what each part does and how it should function.
Basic Components Overview
Every pool table consists of these fundamental elements:
- Playing Surface: The flat cloth-covered area where balls roll
- Rails: The raised wooden borders surrounding the playing surface
- Cushions: Rubber bumpers attached to rails that provide ball rebound
- Pockets: Six openings where balls are targeted (four corners, two sides)
- Cloth (Felt): Specialized fabric covering the playing surface
- Reference Marks: Spots, strings, and diamonds that serve as positioning guides
In the following sections, we'll explore each of these components in detail, helping you understand not just what they are, but why they matter for your game.
Start exploring
Tap a rail, cushion, pocket, spot, string, or diamond on the table above to see what it is and why it matters.
2. Pool Table Dimensions and Layout Overview
Before diving into individual components, it's crucial to understand the overall layout and orientation of a pool table. Just like a map needs north, south, east, and west, pool tables have specific directional terms that players use constantly.
Understanding Table Orientation: Head to Foot
Pool tables have two designated ends that define the playing direction and establish reference points for all rules and positioning:
Head of Table
The head of the table is the end where players stand to break. This is your starting position at the beginning of each game. Think of it as "home base" - where the action begins. The head of the table is always the end from which you initiate play.
- Location: The breaking end of the table
- Purpose: Starting position for most games
- Key feature: Contains the "kitchen" (breaking area)
- Common usage: "Break from behind the head string"
Foot of Table
The foot of the table is the opposite end where balls are racked at the start of the game. This is your target area - where the action happens. When someone says "rack them at the foot," they're referring to this end of the table.
- Location: The opposite end from where you break
- Purpose: Ball racking position
- Key feature: Contains the foot spot (rack center point)
- Common usage: "Rack the balls on the foot spot"
💡 Easy Way to Remember:
Head = Break (where you start)
Foot = Rack (where balls are set up)
Think of walking toward something: your head leads (breaking), your feet arrive at the destination (racked balls).

Playing Surface Dimensions
It's important to distinguish between the overall table dimensions and the actual playing surface:
For a 9-Foot Table:
- Overall dimensions: 9 feet × 4.5 feet (including rails)
- Playing surface: Approximately 100 inches × 50 inches (8.33 ft × 4.17 ft)
- Rail width: Typically 4-5 inches on each side
For an 8-Foot Table:
- Overall dimensions: 8 feet × 4 feet (including rails)
- Playing surface: Approximately 88 inches × 44 inches (7.33 ft × 3.67 ft)
- Rail width: Typically 4-5 inches on each side
The table itself is just part of the space equation. You need adequate room around the table for cue stick clearance:
- Minimum clearance: 5 feet on all sides (58-inch cue)
- Recommended clearance: 6 feet on all sides (more comfortable play)
- For 9-foot table: Room should be at least 18 ft × 14 ft
- For 8-foot table: Room should be at least 17 ft × 13 ft
Table Height Standards
Pool tables have standardized heights to ensure consistent play:
- Standard playing surface height: 29.25 inches to 31 inches from the floor
- Most common height: 30 to 31 inches
- Why it matters: Proper height allows for comfortable stance and accurate cueing
Why Orientation Matters
Understanding head versus foot is essential because:
- Rule References: Game rules constantly reference these terms. "Ball in hand behind the head string" means something specific.
- Setup Procedures: Knowing where to rack and where to break is fundamental to starting any game correctly.
- Strategic Communication: Players discuss positioning using these terms: "Leave him at the head end" or "position for the foot spot."
- Table Installation: When setting up a new table, establishing head and foot determines pocket positioning and lighting placement.
When you approach a pool table for the first time, mentally label the ends: "This is where I break (head), that's where balls are racked (foot)." Establishing this orientation first makes everything else about the table easier to understand.
3. Essential Pool Table Parts: The Playing Surface
The playing surface is the heart of any pool table. What appears to be a simple flat green surface is actually a sophisticated combination of materials engineered for precision and durability. Understanding these components helps you appreciate why quality tables play differently and what to look for when purchasing equipment.
The Cloth (Felt)
The cloth, commonly called "felt," is the fabric covering the playing surface. However, pool table cloth isn't actually felt at all - it's a tightly woven worsted wool or wool-nylon blend designed for specific playing characteristics.
Cloth Characteristics:
- Material: Worsted wool (professional) or wool-nylon blend (recreational)
- Weight: Measured in ounces per yard; heavier = more durable
- Weave: Tighter weave = faster play and more accurate ball roll
- Nap: Direction of the fabric weave affects ball direction slightly
Why Green?
The traditional green color isn't just aesthetics. Green was chosen because:
- Easier on the eyes during extended play
- Provides good contrast with colored balls
- Historical connection to lawn games (billiards evolved from outdoor games)
- Reduces glare under bright lighting
Modern tables also come in blue, burgundy, gray, and other colors, but green remains the most common for traditional play.
Cloth Quality Indicators:
- Professional Grade: Simonis, Championship, or other worsted wool brands
- Recreational Grade: Wool-nylon blends for home use
- Speed Rating: Professional cloth is faster; balls roll farther with less effort
- Durability: Higher quality cloth lasts 3-5 years with regular use
The Slate Bed
Underneath the cloth lies the most critical component of a quality pool table: the slate bed. This is the actual playing surface that determines how true and level your balls will roll.
Why Slate?
Slate is used for pool tables because it offers unique properties:
- Perfect flatness: Can be ground to within 0.01 inches of perfectly flat
- Weight provides stability: Heavy slate doesn't shift or vibrate during play
- Won't warp: Unlike wood, slate doesn't expand, contract, or warp with humidity
- Smooth surface: Provides ideal foundation for cloth
- Durability: Lasts indefinitely when properly maintained
Slate Configuration:
Three-Piece Slate (Most Common):
- Three separate slate pieces joined together
- Easier to move and install
- Can be leveled more precisely
- Standard for 8-foot and 9-foot tables
- Seams are filled and smoothed (invisible during play)
One-Piece Slate:
- Single solid piece of slate
- No seams to maintain
- Very heavy and difficult to move
- Common on 7-foot tables
- Premium option for dedicated game rooms
Slate Thickness:
- Professional Standard: 1 inch (25mm) thick
- Recreational Standard: ¾ inch (19mm) thick
- Lower-end Tables: ½ inch (12mm) or less
Some lower-cost tables use MDF (medium-density fiberboard), particleboard, or synthetic materials instead of slate. These alternatives:
- Warp over time with humidity changes
- Cannot be leveled as precisely
- Provide inconsistent ball roll
- Wear unevenly under the cloth

The Frame and Legs
Supporting all of this weight is the table frame and leg system. A 9-foot slate table can weigh 1,000 pounds or more, requiring robust construction.
Frame Construction:
- Material: Hardwood or steel frame
- Purpose: Supports slate weight evenly
- Cross-supports: Prevent sagging over time
- Slate supports: Wooden or metal strips that hold slate in place
Leg Design:
- Four-leg design: Most common, provides stable support
- Six-leg design: Added support for larger tables
- Leg levelers: Adjustable feet for precise leveling
- Styles: Vary from simple posts to ornate carved designs
A simple way to check table level: Place a penny on edge at the center spot. A properly leveled table will keep the penny standing upright without rolling in any direction. If it falls, your table needs leveling adjustment.
4. Rails and Cushions: The Boundaries of Play
The rails and cushions define the playing boundaries and provide the characteristic ball rebound that makes pool possible. Understanding these components helps you predict ball behavior and use rail shots effectively.
Understanding the Rails
Rails are the wooden borders that frame the playing surface. Each pool table has six rails total, divided into two types based on their position and length.
Short Rails (Head Rail & Foot Rail)
The short rails are located at the head and foot ends of the table:
- Head Rail: Located at the head of the table (breaking end)
- Foot Rail: Located at the foot of the table (racking end)
- Length: Approximately half the length of the long rails
- Purpose: Define the width boundaries of the playing surface
Long Rails (Side Rails)
The long rails run the length of the table on both sides:
- Location: Left and right sides of the table
- Length: Span from head to foot, broken only by side pockets
- Purpose: Define the length boundaries of the playing surface
- Usage: Most commonly used for bank shots and position play
💡 Rail Terminology:
When players say "hit it off the rail," they mean banking the ball off one of these cushioned borders. The terms "rail" and "cushion" are often used interchangeably in casual conversation, though technically they're different components.
The Cushions: The Rubber Bumpers
Cushions are the rubber strips attached to the inner edge of each rail. These provide the essential rebound that allows balls to bounce predictably off the table edges.
Cushion Construction:
- Material: Natural rubber or synthetic rubber compound
- Shape: Triangular profile (K-66 is professional standard)
- Attachment: Glued to the wooden rail with specialized adhesive
- Height: Precisely matched to ball diameter (63.5% of ball height)
Cushion Quality Indicators:
- Responsiveness: Should provide 75-80% rebound
- Consistency: All cushions should respond identically
- Temperature sensitivity: Quality cushions maintain performance across temperature ranges
- Longevity: Good cushions last 20-25 years
- Dead spots (areas with reduced bounce)
- Balls bouncing higher than they should
- Inconsistent angles off rails
- Visible hardening or cracking of rubber
- Balls sticking to or rolling along the cushion
Rail Diamonds (Sight Markers)
Along each rail, you'll notice small circular or diamond-shaped markers inlaid into the wood. These are called rail diamonds or sight markers, and they're crucial reference points for aiming and positioning.
Diamond Placement:
- Long rails: Typically 8 diamonds per rail (evenly spaced)
- Short rails: Typically 4 diamonds per rail (evenly spaced)
- Spacing: Diamonds divide the rail into equal segments
- Material: Usually white or contrasting inlay for visibility
Professional players learn sophisticated "diamond systems" - mathematical approaches to banking and kicking using the rail diamonds as calculation points. While these systems can seem complex, they're based on simple geometry: the angle of incidence equals the angle of reflection. Diamonds just make visualizing and calculating these angles easier.

🎯 Master Table Positioning with Ghost Ball Aim Trainer
Now that you understand table anatomy, learn to use these reference points for perfect aiming with our specialized training tool:
- Practice using rail diamonds for banking shots
- Develop muscle memory for pocket angles
- Master cue ball positioning from any spot on the table
- Visualize shot paths using table reference points
- Accelerate your understanding of table geometry
Understanding where everything is on the table is the first step. The Ghost Ball Aim Trainer helps you use this knowledge to make accurate shots consistently.
Shop Ghost Ball Trainer →
5. Pockets and Spots: Key Reference Points
Pockets are the ultimate destination for every shot in pool, while spots are the invisible anchors that define where balls are placed and where players aim. Together, these elements create the fundamental targets and reference points that structure every game.
The Six Pockets
Every regulation pool table has exactly six pockets - four corner pockets and two side pockets.
Corner Pockets (4 Total)
- Location: Where two rails meet at right angles
- Opening width: Typically 4.5 to 5 inches wide
- Acceptance angle: Approximately 142° (wider)
- Difficulty: Easier targets due to two-rail funnel effect
Side Pockets (2 Total)
- Location: Center of each long rail
- Opening width: Typically 5 to 5.5 inches wide
- Acceptance angle: Approximately 103° (narrower)
- Difficulty: More challenging despite being wider
💡 Pocket Selection Strategy:
When you have a choice between pocketing a ball in a corner versus a side pocket from similar distances, the corner pocket is almost always the higher-percentage shot. Save side pocket attempts for situations where they're clearly the best tactical choice.
The Three Spots
Foot Spot
- Location: One-quarter of the table length from the foot rail, center
- Primary use: Center point for racking balls
- Most important spot — apex ball always sits here
Center Spot
- Location: Exact geometric center of the playing surface
- Primary use: Reference point for certain games and table maintenance
Head Spot
- Location: One-quarter of the table length from the head rail, center
- Primary use: Placement point for specific game rules
The three spots are always positioned in a straight line down the exact center of the table. The foot spot is closest to the racking end, the center spot is in the middle, and the head spot is closest to the breaking end.
6. Markings and Strings: Navigation on the Table
Beyond the visible cloth and pockets, pool tables have invisible reference lines called "strings" that divide the playing surface into zones. These imaginary lines are critical for understanding game rules and strategic positioning.
The Three Strings (Imaginary Lines)
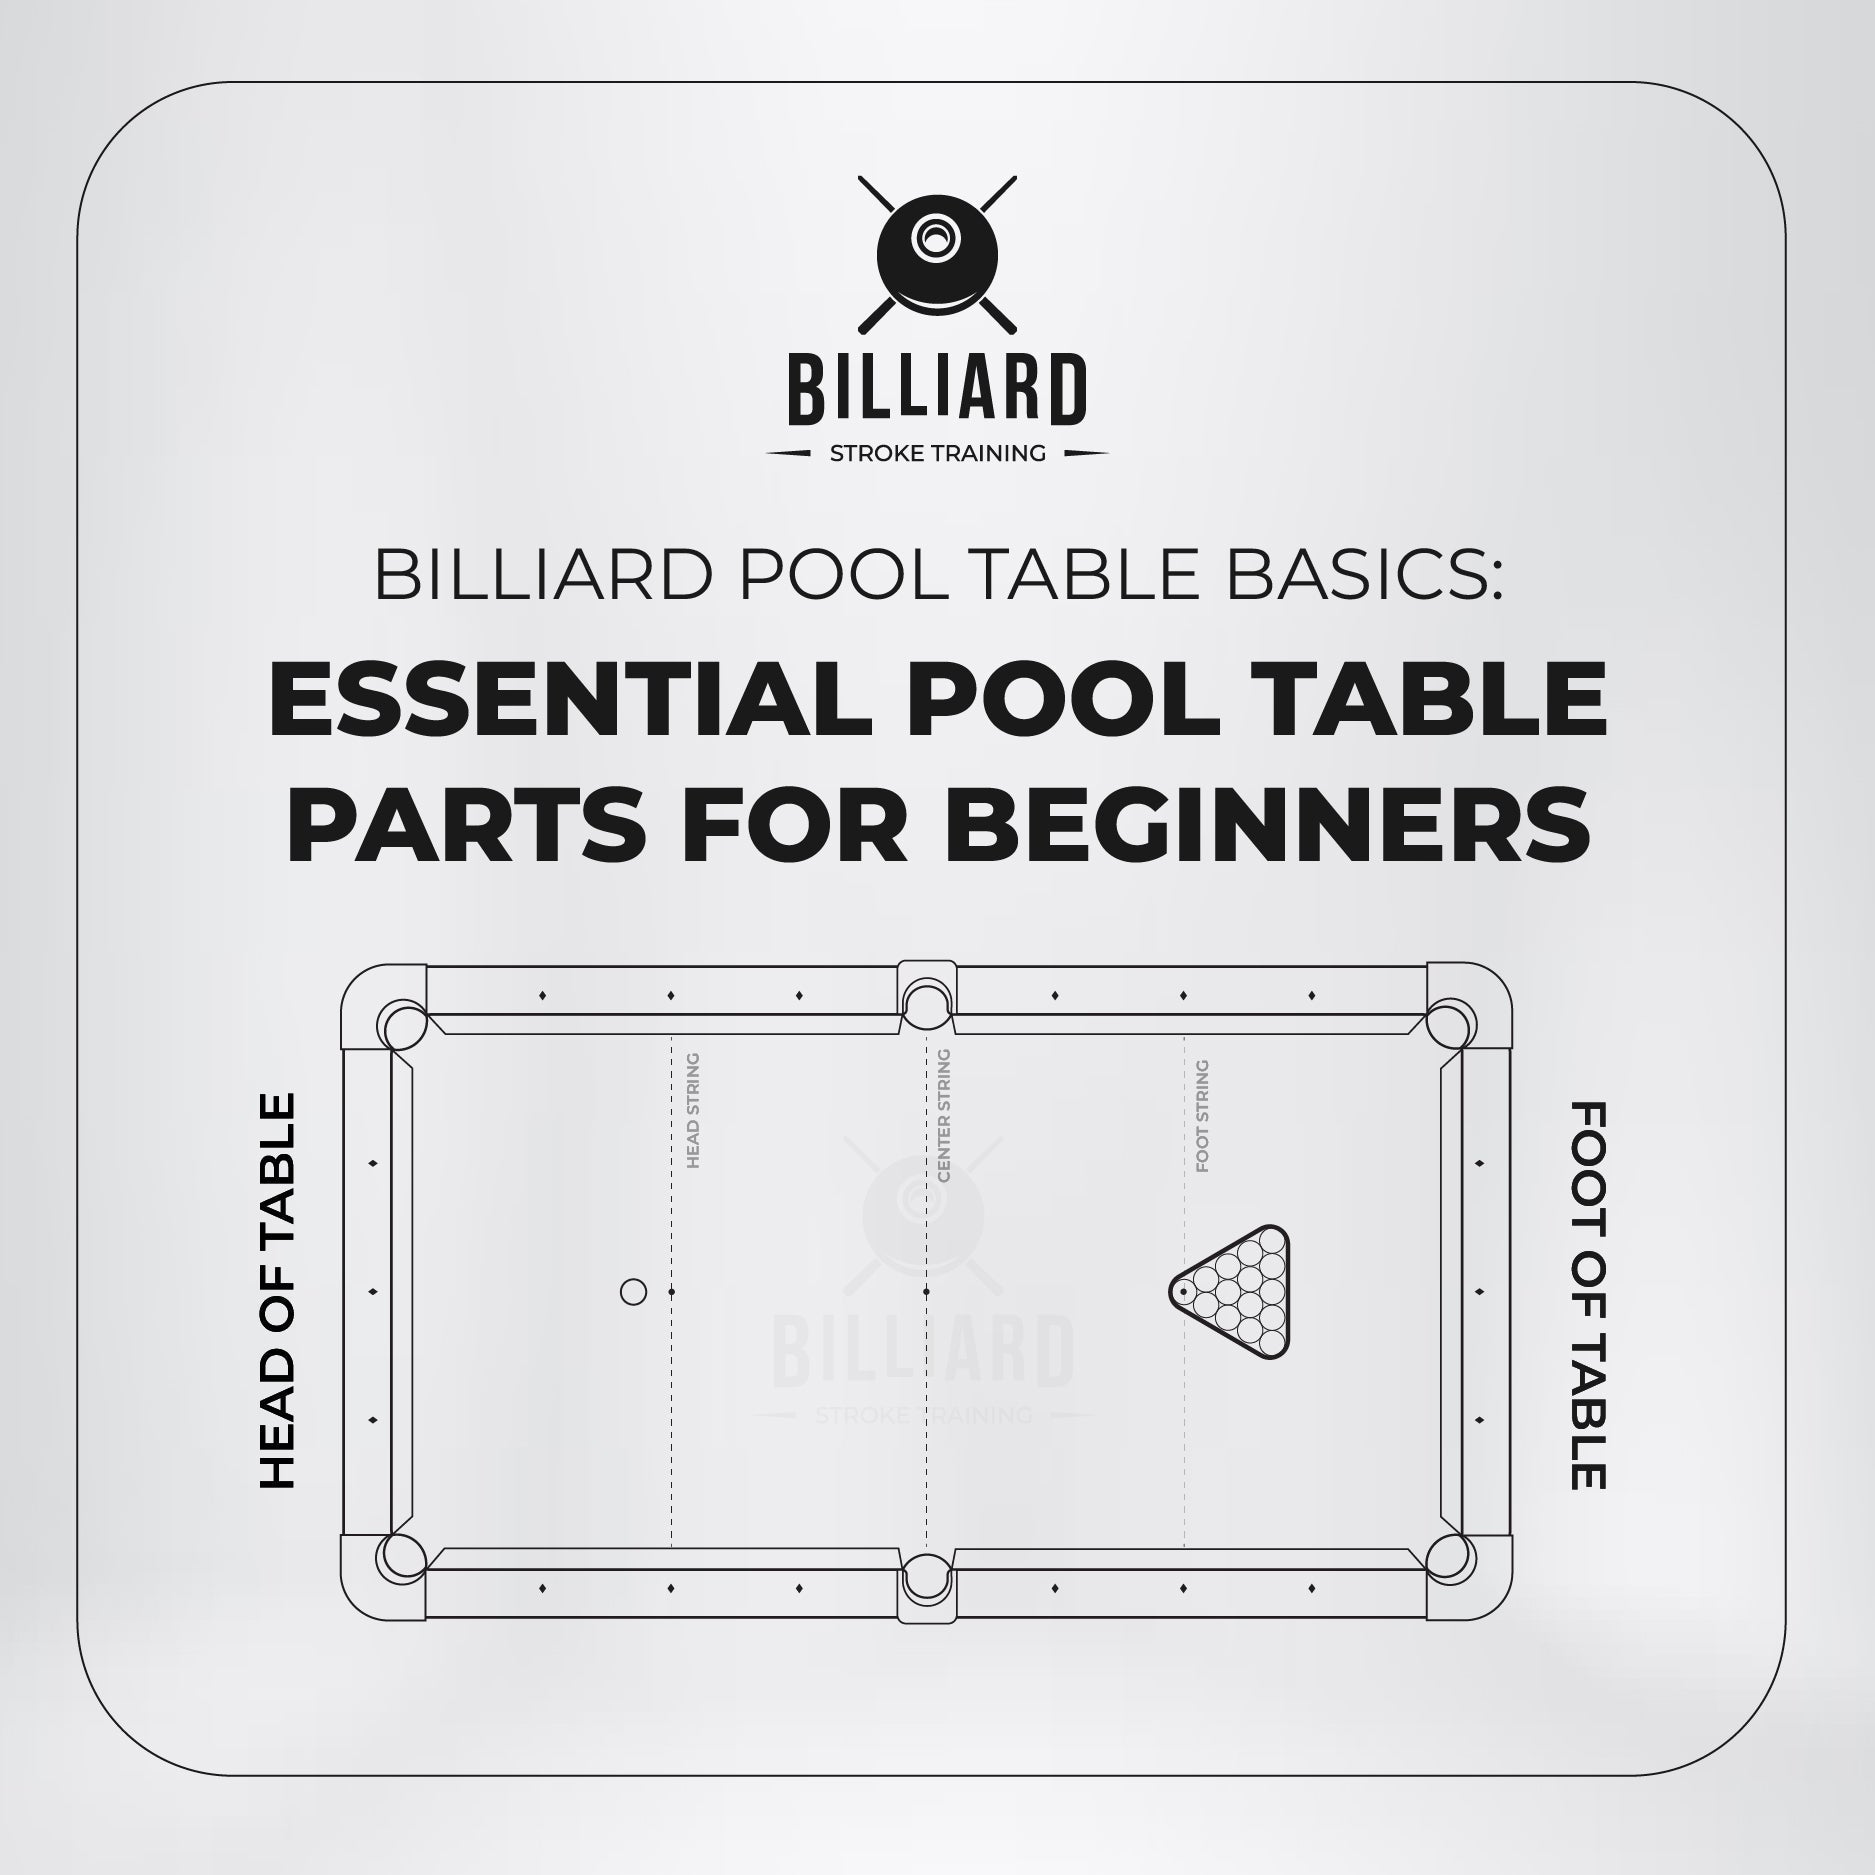
Head String
- Location: Passes through the head spot, parallel to the head rail
- Distance from head rail: Exactly one-quarter of the table length
- Critical use: Defines the "kitchen" boundary — players must break from behind this line
Center String
- Location: Lengthwise down the exact center, through all three spots
- Use: Table alignment checks, symmetrical shot planning, some banking systems
Foot String
- Location: Passes through the foot spot, parallel to the foot rail
- Distance from foot rail: Exactly one-quarter of the table length
- Use: Geometric reference for rack positioning
The Kitchen (Breaking Area)
The kitchen is the zone behind the head string — roughly the first quarter of the table from the head rail. In most pool games, you must break from within the kitchen.
New players often confuse "behind the head string" with "on the head string." Behind means toward the head rail side — inside the kitchen area. The head string itself is not part of the kitchen; it's the boundary line.
💡 Quick Kitchen Check:
Look at the long rails. If the cue ball is between the head rail and the second diamond on both long rails, you're in the kitchen. If it's past the second diamond toward the foot end, you're out of the kitchen.
🎱 Develop Consistent Stroke Mechanics
Knowing the table is important, but delivering a straight, consistent stroke is what brings it all together:
- Eliminate side-to-side movement for accurate shots
- Build muscle memory for proper stroke mechanics
- Improve your ability to hit intended contact points
- Develop confidence in your stroke fundamentals
- Practice at home anytime to reinforce proper form
Combine your knowledge of table anatomy with a reliable stroke. The Billiard Stroke Training Board ensures every shot starts with solid fundamentals.
Shop Stroke Training Board →
7. Pool Table Diagram: Complete Visual Guide
Now that we've explored each component individually, let's bring it all together with a comprehensive visual reference.
Complete Component Reference Chart
| Component | Location | Purpose | Importance |
|---|---|---|---|
| Head of Table | Breaking end | Starting position for play | High |
| Foot of Table | Opposite end from head | Ball racking position | High |
| Head Rail | Short rail at head | Table boundary | Medium |
| Foot Rail | Short rail at foot | Table boundary | Medium |
| Side Rails (Long Rails) | Both long sides (2 total) | Table boundaries, banking surface | High |
| Cushions | Attached to all rails | Ball rebound surface | Very High |
| Corner Pockets | Four corners | Ball targets (easier) | Very High |
| Side Pockets | Middle of long rails (2 total) | Ball targets (harder) | Very High |
| Foot Spot | 1/4 from foot rail, center | Rack center point | Very High |
| Center Spot | Exact center of table | Reference point | Low |
| Head Spot | 1/4 from head rail, center | Reference point | Medium |
| Head String | Through head spot, parallel to head rail | Kitchen boundary | Very High |
| Center String | Lengthwise, through all spots | Table division reference | Low |
| Foot String | Through foot spot, parallel to foot rail | Reference line | Low |
| The Kitchen | Behind head string | Breaking area, ball-in-hand zone | Very High |
| Rail Diamonds | Inlaid along all rails | Aiming and positioning markers | High |
| Cloth (Felt) | Covers playing surface | Ball rolling surface | Very High |
| Slate Bed | Under cloth | Perfectly flat playing surface | Very High |

🧠 Test Your Knowledge — Click to Reveal Answers
Test yourself on pool table anatomy before checking the answers:
Q1: Where is the cue ball placed when breaking in 8-ball?
Q2: Which pockets are typically harder to make — corner or side?
Q3: What's the difference between a rail and a cushion?
Q4: Where is the 9-ball positioned when racking for 9-ball?
Q5: How many rail diamonds are typically on a long rail?
Q6: What is the 2:1 ratio rule for pool tables?
Q7: What material is under the cloth on quality tables?
Q8: Which spot is used as the center of the rack?
8. Frequently Asked Questions
What are the main parts of a pool table?
What is the difference between the head and foot of a pool table?
What is the kitchen in pool?
What are rail diamonds used for in billiards?
Why are side pockets harder than corner pockets?
What is the foot spot and why does it matter?
What is slate and why is it used in pool tables?
Conclusion
Understanding pool table anatomy transforms you from a confused beginner to a knowledgeable player who can follow rules, communicate effectively, and strategize intelligently. Every component we've covered — from the head and foot orientation to the invisible strings and visible diamonds — serves a specific purpose in creating the structured playing environment that makes pool such a precise and strategic game.
As you continue your pool journey, this knowledge of table anatomy will serve as your foundation. When you hear terms like "behind the head string," "on the foot spot," or "two diamonds from the corner," you'll understand exactly what's being communicated. Remember: every professional player started exactly where you are now — learning the basics. The difference between beginners and experts isn't innate talent; it's knowledge, practice, and proper fundamentals.
🚀 Ready to Put Your Knowledge into Practice?
Understanding pool table anatomy is your foundation. Now take the next step with professional training equipment designed to improve your game faster than table time alone.
Shop All Training Equipment →