Billiard Bridge Hand Techniques: 5 Bridges Explained
Key Takeaways
- Your bridge hand is the anchor that keeps the cue stable and on-line - even a perfect stroke misses if the bridge is unstable.
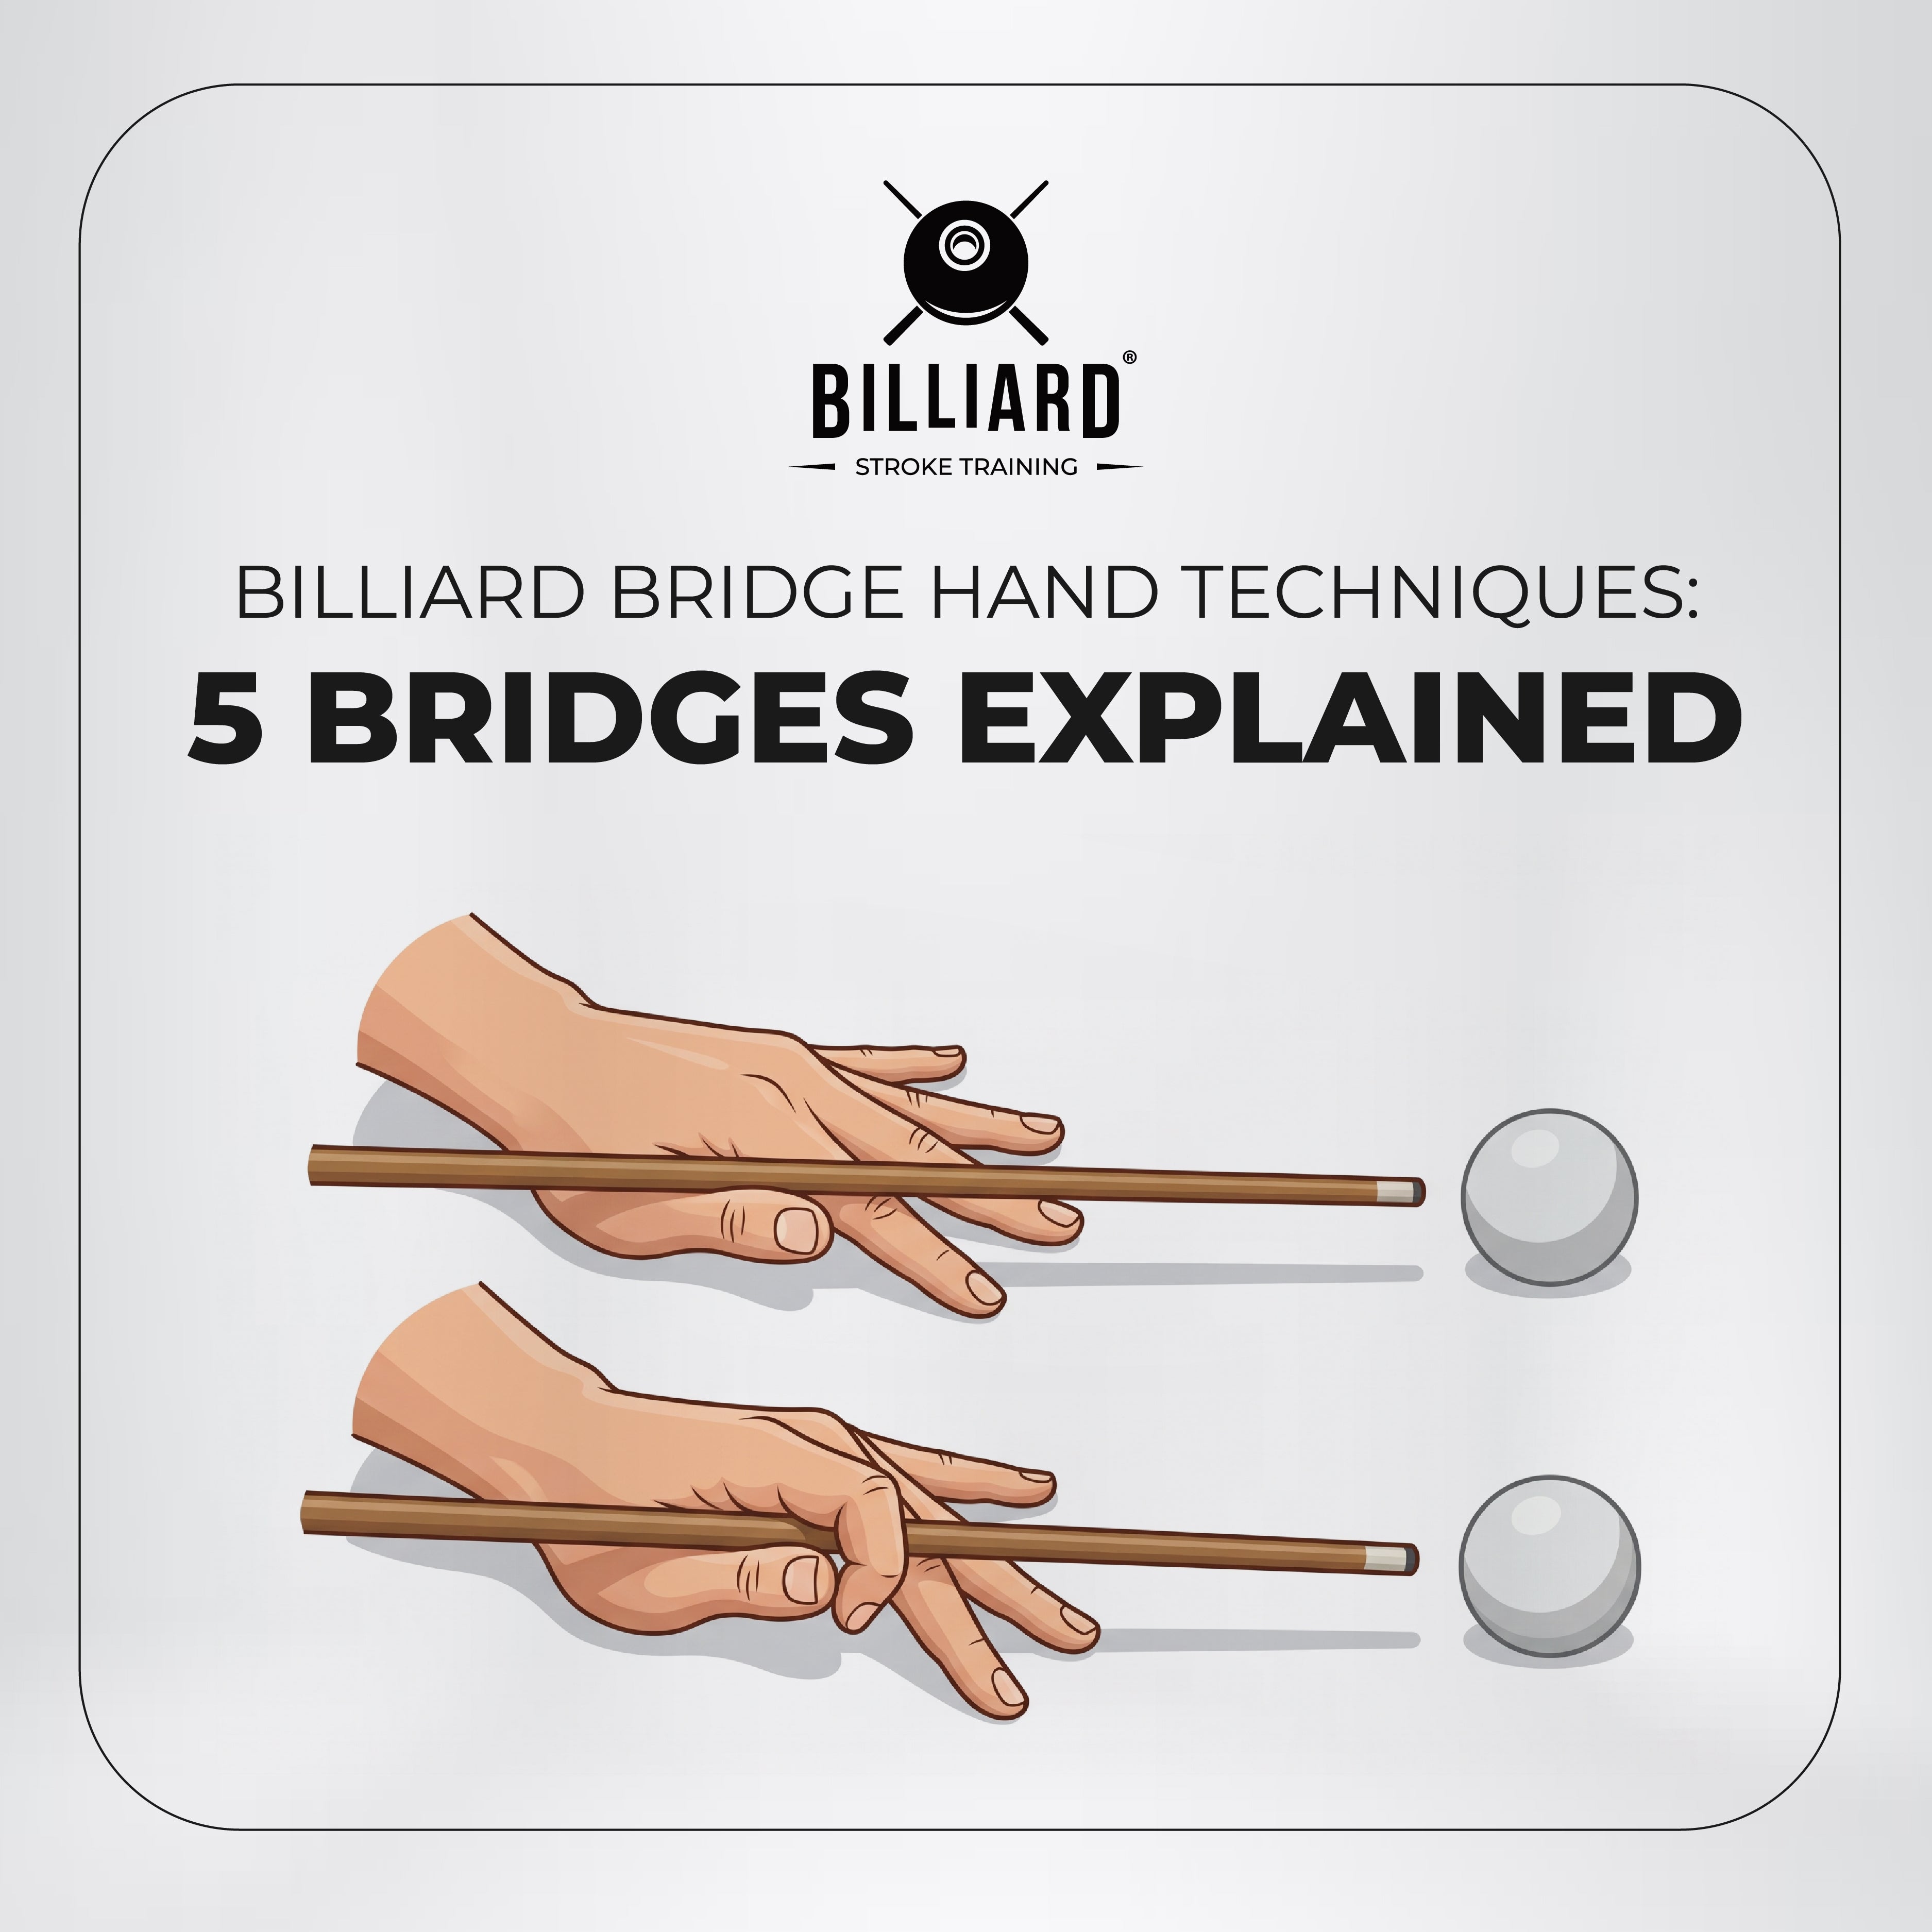
- Open bridge (cue in a V-groove between thumb and index finger): easiest to learn, best visibility, ideal for beginners and soft shots.
- Closed bridge (index finger looped over the cue): more lateral stability, the preferred choice for power shots and English (side spin).
- Elevated, rail, and mechanical bridges exist for specific situations - clearing an obstacle ball, playing off the cushion, and reaching distant shots. Using the mechanical bridge when needed is correct technique, not a weakness.
- Keep your bridge hand roughly 6-10 inches (15-25 cm) from the cue ball, with a wide, relaxed but firm base, and keep that distance consistent across similar shots.
📋 Table of Contents
- 1. Why Bridge Hand Technique Matters
- 2. The Open Bridge: Foundation for Beginners
- 3. The Closed Bridge: Advanced Control
- 4. The Elevated Bridge: Overcoming Obstacles
- 5. The Rail Bridge: Playing from the Cushion
- 6. The Mechanical Bridge: Reaching Distant Shots
- 7. Practice Tips and Common Mistakes
- 8. Frequently Asked Questions
1. Why Bridge Hand Technique Matters
The bridge hand serves multiple critical functions that directly impact shot quality:
Stability and Consistency
Your bridge creates a stable platform for the cue shaft to glide through. Without a solid bridge:
- Cue wobble: The shaft moves side-to-side during your stroke
- Inconsistent contact: You hit different points on the cue ball unintentionally
- Variable power: Force delivery becomes unpredictable
- Directional errors: Shots miss left or right of target
Shot Control
The bridge determines several shot characteristics:
- Cue elevation: Height of the bridge controls cue angle
- Stroke length: Distance from bridge to cue ball affects follow-through
- English application: Stable bridge essential for accurate off-center hits
- Power transfer: Solid bridge enables efficient energy delivery
Adaptability
Different shot situations require different bridge types. Mastering multiple bridges allows you to:
- Handle awkward ball positions near rails
- Navigate around interfering balls
- Execute elevated shots and jump shots
- Reach distant shots across the table
- Maintain consistency regardless of circumstances
Watch professional players closely and you'll notice their bridge hand barely moves during the stroke. Rock-solid stability is the hallmark of expert play. Any movement in the bridge translates directly to inconsistency in shot results.
2. The Open Bridge: Foundation for Beginners
The open bridge (also called the V-bridge) is typically the first bridge beginners learn. It's simple, natural, and effective for standard shots.
How to Form an Open Bridge
- Spread your fingers: Place your bridge hand flat on the table, fingers spread wide
- Create the V: Raise your thumb and press it against the side of your index finger
- Form the channel: The cue rests in the V-shaped groove between thumb and finger
- Arch your hand: Lift your knuckles slightly to create clearance
- Anchor firmly: Press fingertips into the cloth for stability
When to Use the Open Bridge
- Learning phase: Ideal for beginners developing basic mechanics
- Straight shots: Perfect for simple, straight-in shots
- Soft to medium power: Controlled shots without excessive force
- Center ball hits: When striking the cue ball dead center
- Visibility preference: Some players like seeing more of the cue ball
Advantages
- Easy to learn: Natural hand position, minimal technique required
- Clear view: Open top provides better sight of contact point
- Quick setup: Faster to form than closed bridge
- Comfortable: Less finger strain for long practice sessions
Limitations
- Less stable: Cue can lift out of the groove during powerful strokes
- Limited for English: Harder to maintain stability with off-center hits
- Power shots: Not ideal for maximum power delivery
💡 Open Bridge Pro Tip:
Even if you prefer the open bridge, learn the closed bridge for situations requiring maximum stability. Many professional players use open bridges for soft shots and switch to closed for power or English shots.


3. The Closed Bridge: Advanced Control
The closed bridge (also called the loop bridge or professional bridge) provides maximum stability and control, making it the preferred choice for advanced players and challenging shots.
How to Form a Closed Bridge
- Start with open position: Begin with hand flat, fingers spread
- Wrap the index finger: Curl your index finger over the cue shaft
- Touch thumb to finger: Bring your thumb tip to meet your index finger
- Create the loop: Form a complete circle around the cue
- Support with other fingers: Middle, ring, and pinky fingers spread for stability
- Maintain the arch: Keep knuckles elevated for proper cue clearance
When to Use the Closed Bridge
- Power shots: Breaking, power position play
- English application: Any shot requiring sidespin
- Draw shots: Backspin requires stable bridge for below-center hits
- Follow shots: Topspin also benefits from closed bridge stability
- Precision shots: When accuracy is critical
- Professional play: Tournament and competitive situations
Advantages
- Maximum stability: Cue is locked in place, cannot lift out
- Power delivery: Enables maximum force transfer without bridge failure
- English control: Essential for accurate off-center hits
- Consistent stroke: Same groove every time, promotes muscle memory
- Professional standard: Used by vast majority of top players
Common Mistakes
- Too tight: Gripping the cue restricts smooth stroke
- Too loose: Defeats the purpose of closed bridge
- Flat hand: Not enough knuckle elevation causes cue drag
- Collapsed arch: Hand flattens during stroke, changing cue angle
Professional players overwhelmingly prefer the closed bridge. While the open bridge has its place, learning a proper closed bridge is essential for advancing beyond intermediate level. Invest time mastering this technique - it pays dividends throughout your pool career.


4. The Elevated Bridge: Overcoming Obstacles
The elevated bridge raises your hand higher than normal to angle the cue downward. This allows you to shoot over interfering balls or execute jump shots.
How to Form an Elevated Bridge
- Raise your hand: Lift your entire bridge hand higher off the table
- Support on fingertips: Balance on your fingertips and thumb
- Create the channel: Use open or closed bridge formation as needed
- Maintain stability: Despite elevation, keep hand as steady as possible
- Adjust height: Raise only as high as necessary for the shot
Types of Elevated Bridges
Low Elevation:
- Slightly raised for minor obstacles
- More stable than high elevation
- Used for gentle masse effects
Medium Elevation:
- Moderate height for shooting over one ball
- Balance between stability and clearance
- Common in crowded ball situations
High Elevation:
- Maximum height for jump shots
- Least stable, requires practice
- Advanced technique for skilled players
When to Use Elevated Bridge
- Ball interference: When another ball blocks normal bridge placement
- Jump shots: Intentionally making cue ball hop over obstacles
- Curve shots: Creating masse effect for curved ball path
- Tight clusters: Navigating congested areas of the table
Elevated bridges are inherently less stable than standard bridges. The higher you raise your hand, the more difficult it becomes to maintain steadiness. Practice elevated bridges extensively before relying on them in competitive play. Many missed shots in these situations come from bridge instability, not aiming errors.


5. The Rail Bridge: Playing from the Cushion
When the cue ball is frozen or very close to a rail, you cannot place your hand on the table in the normal position. The rail bridge uses the cushion itself as a support point.
How to Form a Rail Bridge
Method 1 - Open Rail Bridge:
- Place your hand on top of the rail
- Spread fingers for stability
- Create V-channel with thumb and index finger
- Rest cue in the groove
- Keep hand relaxed but stable
Method 2 - Knuckles on Rail:
- Place the back of your hand on the rail
- Knuckles facing up
- Cue rests in grooves between knuckles
- More stable for power shots
Method 3 - Fingers Over Rail:
- Drape fingers over the rail edge
- Thumb on near side, fingers on far side
- Cue rests on top of rail, guided by thumb
- Used when ball is extremely close to cushion
When to Use Rail Bridge
- Frozen to rail: Cue ball touching the cushion
- Very close to rail: Less than 6 inches from cushion
- Awkward angles: When standard bridge won't reach properly
- Break shots near rails: Starting position close to cushion
Common Challenges
- Stability: Rail bridges are naturally less stable
- Cue angle: Difficult to maintain level cue
- Limited stroke: Reduced follow-through space
- Inconsistent surface: Rail tops vary between tables
💡 Rail Bridge Practice Drill:
Place balls along the rail at various positions. Practice forming rail bridges and shooting these balls into pockets. This common game situation deserves dedicated practice time that many players neglect.

6. The Mechanical Bridge: Reaching Distant Shots
The mechanical bridge (also called the rake, bridge stick, or crutch) is a tool that replaces your bridge hand when the cue ball is too far to reach comfortably.
When to Use the Mechanical Bridge
- Distance: Cue ball beyond comfortable reaching distance
- Stretching impossible: Cannot reach even with full body extension
- Better alternative: When attempting to reach would compromise stability
- Physical limitations: Injury, flexibility, or height restrictions
How to Use the Mechanical Bridge Effectively
- Position the bridge: Place bridge head near cue ball, stable on table
- Select groove: Choose appropriate notch for desired cue elevation
- Hold firmly: Grip the handle with your bridge hand
- Stabilize: Press down to prevent movement during stroke
- Smooth stroke: Extra smooth delivery required - mechanical bridge is less stable
- Follow through: Complete your stroke despite reduced feel
Common Mistakes with Mechanical Bridge
- Avoiding it unnecessarily: Pride leads to awkward stretching and missed shots
- Unstable placement: Bridge head moves during stroke
- Wrong groove: Incorrect height selection for the shot
- Rushing: Mechanical bridge shots require extra patience
- Too much power: Gentle strokes work better with mechanical bridge
Don't view the mechanical bridge as a sign of weakness. Professional players use it without hesitation when it's the best option. Using the bridge instead of awkwardly stretching often leads to BETTER results, not worse. Practice with it until it feels natural - it's part of complete pool skills.

7. Practice Tips and Common Mistakes
Essential Bridge Practice Drills
Drill 1: Bridge Formation Repetition
- Form each bridge type 20 times without shooting
- Focus on consistency and muscle memory
- Check form in a mirror or video recording
- Goal: Instant, perfect formation every time
Drill 2: Bridge Type Transitions
- Practice switching between bridge types
- Open → Closed → Elevated → Rail
- Build flexibility and adaptability
- Simulate game situations requiring quick adjustments
Drill 3: Stability Test
- Form your bridge and freeze
- Hold position for 30 seconds
- Bridge should remain rock-solid throughout
- Any shaking or movement indicates need for strengthening
Drill 4: Situational Practice
- Set up challenging bridge situations deliberately
- Ball near rail, crowded positions, long reaches
- Practice each bridge type in realistic scenarios
- Build confidence for in-game execution
Common Bridge Mistakes to Avoid
1. Moving Bridge During Stroke
- Problem: Bridge hand lifts, shifts, or collapses during delivery
- Cause: Insufficient stability, poor muscle control
- Fix: Anchor firmly, practice stroke without hitting cue ball
2. Inconsistent Bridge Distance
- Problem: Bridge varies in distance from cue ball shot to shot
- Cause: No established routine, lack of awareness
- Fix: Develop consistent 6-10 inch bridge length, measure and practice
3. Insufficient Hand Spread
- Problem: Fingers too close together, unstable base
- Cause: Tension, habit, lack of awareness
- Fix: Spread fingers wide for tripod stability
4. Wrong Bridge for Situation
- Problem: Using open bridge when closed is needed, etc.
- Cause: Comfort zone, limited bridge repertoire
- Fix: Learn all bridge types, practice decision-making
5. Gripping the Cue
- Problem: Bridge hand squeezes cue shaft (especially in closed bridge)
- Cause: Tension, misunderstanding of "closed" bridge
- Fix: Closed bridge loops around cue but doesn't grip it
Building Bridge Hand Strength
A stable bridge requires hand and finger strength:
- Finger exercises: Squeeze stress ball, finger push-ups
- Wrist strengthening: Wrist curls, rotations
- Endurance training: Hold bridge position for extended periods
- Regular practice: Extended practice sessions build natural strength
Expert players have formed their bridge hand tens of thousands of times. This repetition creates unconscious competence - perfect formation without thought. Commit to deliberate practice of bridge formation, and within months you'll notice dramatic improvement in shot consistency. Your bridge becomes automatic, freeing mental energy for strategy and shot selection.
8. Frequently Asked Questions
What is the best bridge for beginner pool players?
What is the difference between an open bridge and a closed bridge?
How far should my bridge hand be from the cue ball?
When should I use an elevated bridge?
How do I form a rail bridge in pool?
Is it bad to always use the mechanical bridge?
Why does my bridge hand slip during shots?
Should I use an open or closed bridge for shots with English?
Conclusion
Your bridge hand is the foundation upon which all other pool skills are built. Without a solid, stable bridge, even perfect stroke mechanics and aiming ability cannot produce consistent results. The ball goes where your cue sends it, and your cue goes where your bridge guides it.
Master these essential bridge types:
- Open bridge: Your starting point, perfect for learning and soft shots
- Closed bridge: The professional standard for power and English
- Elevated bridge: Navigate obstacles and crowded tables
- Rail bridge: Handle shots along the cushion confidently
- Mechanical bridge: Reach distant shots without compromising stability
Each bridge type has specific applications, and complete players master them all. Don't limit yourself to one comfortable bridge - expand your repertoire to handle any table situation. The most common reason intermediate players miss shots isn't aiming errors - it's unstable bridges causing directional inconsistency.
Commit to deliberate bridge practice. Form each bridge correctly hundreds of times until it becomes automatic. Practice the bridges you're weakest at, not just the comfortable ones. Set up challenging situations deliberately and work through them with proper bridge technique.
Remember: A shot is only as accurate as the bridge that guides it. Invest time in this fundamental skill, and watch your consistency and confidence soar. Every professional started exactly where you are now - developing rock-solid bridge fundamentals that became the bedrock of their advanced game.
🚀 Ready to Build Championship Fundamentals?
Perfect bridge technique combined with straight stroke mechanics and accurate aiming creates consistent, winning pool. Accelerate your development with professional training equipment.
Shop All Training Equipment →